RV Boondocking Power Guide: Everything You Need to Know

Jake has spent 8 years full-timing in a Class A motorhome and has personally tested hundreds of RV products across North America. He is the lead gear reviewer at Shop RV Gear, covering solar setups, backup safety syst…
Why trust us
Every product featured on Shop RV Gear is researched by RV owners with real on-road experience. Our lead reviewer Jake Morris has full-timed for 8 years and personally tested gear across 40+ states. We earn a small commission on qualifying purchases — this never influences our picks.
RV Boondocking Power Guide: Everything You Need to Know
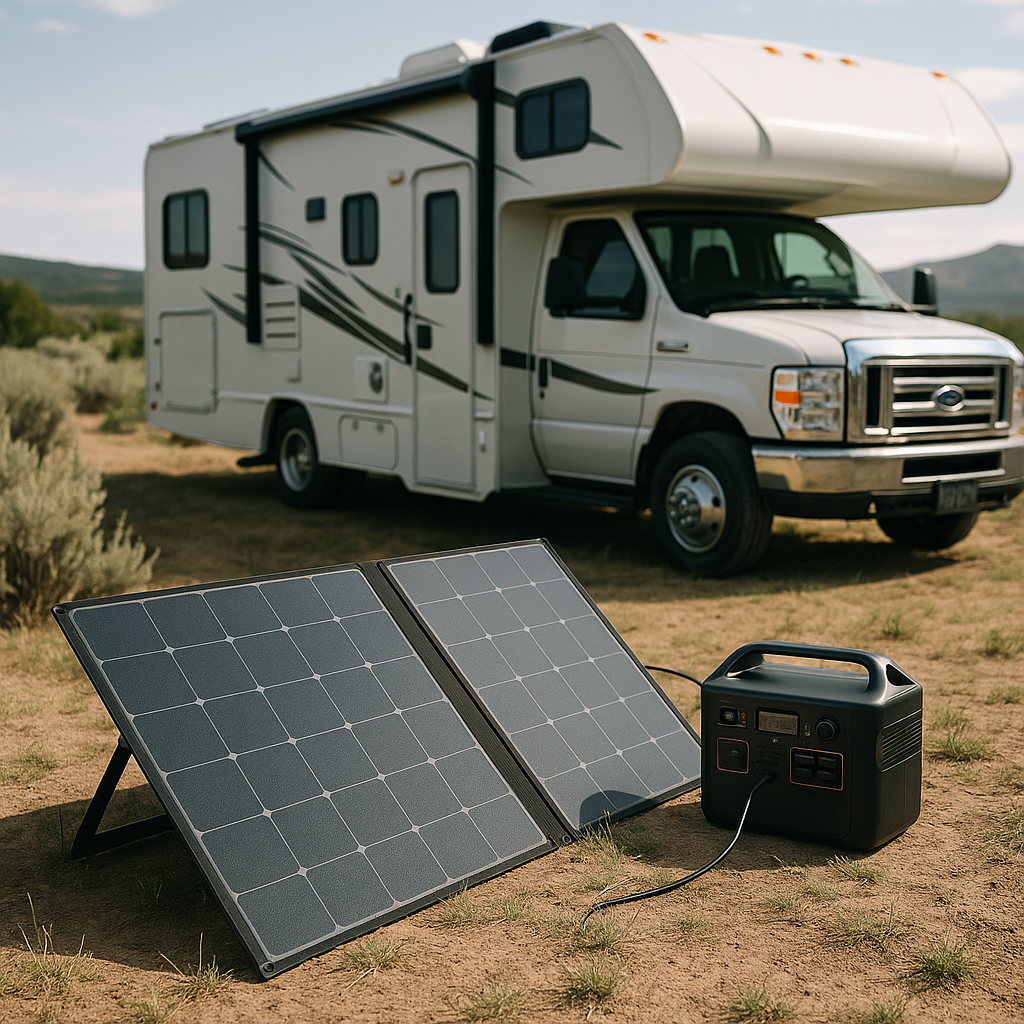
A reliable rv boondocking power setup is the difference between a relaxing off-grid trip and constantly worrying about dead batteries, warm food, or a furnace that quits at 3 a.m. At Shop RV Gear, we’ve tested common power components and planning methods across real camping scenarios, and we recommend building your system around your actual daily power use—not guesswork.
Recommended Setup Levels
Below is a practical side-by-side comparison of common boondocking power tiers.

| Setup Level | Battery Bank | Solar Array | Inverter | Best For | Main Limitation |
|---|---|---|---|---|---|
| Basic | 100Ah lithium | 200W | 1000W | Weekend campers, light loads | Limited reserve on cloudy days |
| Balanced | 200Ah lithium | 400W | 2000W | Most couples, regular boondocking | Careful use still needed for high-draw appliances |
| Extended Stay | 300-400Ah lithium | 600-800W | 2000-3000W | Frequent off-grid travel, remote camping | Higher upfront cost |
| Hybrid Backup | 200-400Ah lithium | 400-800W | 2000-3000W + generator | Four-season users, unpredictable weather | More equipment to store and maintain |
Why Power Planning Matters for Boondocking
When you camp without hookups, every watt matters. Your battery bank has a fixed amount of usable energy, your solar has limited production hours, and your inverter can only support so much load at once. If one part of the system is undersized, the whole setup feels frustrating.
A good boondocking power system should do three things well:
- Store enough energy for overnight and cloudy-day use
- Recharge fast enough to keep up with your daily consumption
- Run the devices you actually care about without constant micromanaging
For most RVers, that means balancing four core components:

- Battery bank
- Solar array
- Charge controller
- Inverter
Many travelers also add a generator as backup for poor weather or high-demand appliances.
The Core Parts of an RV Boondocking Power Setup
Batteries: Your Energy Storage
Your batteries are the foundation of the system. If we had to prioritize one upgrade for serious boondocking, it would usually be the battery bank.
Lithium vs. AGM
Lithium (LiFePO4) batteries are our top recommendation for most RV owners because they offer:
- More usable capacity
- Faster charging
- Lower weight
- Longer lifespan
- Better voltage stability under load
AGM batteries still work, especially for budget builds, but they are heavier and offer less usable capacity. A 100Ah AGM battery does not give you the same practical performance as a 100Ah lithium battery.
Solar Panels: Your Daily Recharge Source
Solar is what keeps you off-grid longer without running a generator. Roof-mounted panels are the most convenient, while portable panels can help if you park in shade.
As a rough baseline:
- 200W solar: light users, weekend trips, mild weather
- 400W solar: solid starting point for many couples
- 600W+ solar: better for frequent boondockers, larger battery banks, and more electronics
Charge Controller: The Traffic Cop
The charge controller regulates power from the solar panels into your battery bank.
PWM vs. MPPT
We recommend MPPT controllers for most serious boondocking setups because they are more efficient, especially with larger arrays or varying weather conditions. PWM controllers are cheaper, but usually make more sense only for very small systems.
Inverter: AC Power for Household Devices
If you want to run 120V appliances such as a coffee maker, TV, laptop charger, or microwave, you need an inverter.
A pure sine wave inverter is the better choice for RV use because it is safer for sensitive electronics and generally more versatile.
Typical sizing:
- 1000W inverter: laptops, chargers, TV, small appliances
- 2000W inverter: coffee maker, microwave, hair tools, broader flexibility
- 3000W inverter: larger loads, more simultaneous use, bigger systems
Generator: Smart Backup, Not Always a Necessity
A generator is not mandatory, but it is still useful for:
- Several cloudy days in a row
- Running air conditioning in many rigs
- Fast bulk charging when batteries are low
- Emergency backup power
For many RVers, the best setup is solar plus lithium, with a generator as insurance rather than the main power source.
How to Size Your System Correctly
The biggest mistake we see is buying components before calculating daily energy use. Start with your real loads.
Step 1: List What You Use Daily
Write down the appliances and devices you expect to run each day:
- RV fridge controls
- Furnace fan
- Water pump
- Interior lights
- Vent fan
- CPAP machine
- Laptop charging
- TV or streaming device
- Coffee maker
- Microwave
Step 2: Estimate Watt-Hours Per Day
Use this simple formula:
Watts × Hours Used Per Day = Watt-hours (Wh)
Example daily use:
- LED lights: 30W × 4 hours = 120Wh
- Vent fan: 40W × 6 hours = 240Wh
- Laptop: 60W × 3 hours = 180Wh
- TV: 80W × 2 hours = 160Wh
- Water pump: 60W × 0.3 hours = 18Wh
- Furnace fan: 90W × 3 hours = 270Wh
Total: 988Wh per day
Add a 15-20% buffer for inefficiencies and unexpected use. In this example, we’d plan for around 1,150-1,200Wh per day.
Step 3: Match Battery Capacity to Your Needs
A 12V 100Ah lithium battery provides roughly 1,280Wh of total capacity, with most of it usable. That means one 100Ah lithium battery can support a light-use day, but two batteries give much more comfort and reserve.
Practical rule of thumb:
- 100Ah lithium: minimalist weekend use
- 200Ah lithium: strong starting point for many RVers
- 300-400Ah lithium: frequent boondocking, heavier loads, more flexibility
Step 4: Size Solar to Replace Daily Use
If you use 1,200Wh per day, your solar should ideally replace that energy during available sun hours.
In real-world RV conditions, 400W of solar often produces enough for moderate daily use in decent weather, but not always in winter, tree cover, or overcast conditions. That is why a battery reserve matters.
Our Top Power Setup Picks by Camping Style
1. Basic Weekend Setup
Configuration: 100Ah lithium, 200W solar, MPPT controller, 1000W inverter
Pros:
- Lower cost entry point
- Good for lights, fans, charging devices, and short trips
- Lightweight compared with AGM systems
Cons:
- Limited capacity for furnace-heavy nights
- Not ideal for microwave or coffee maker use every day
- Less forgiving in shade or poor weather
Who It’s For: RV owners who boondock occasionally, stay 1-3 nights off-grid, and mostly power essentials.
2. Balanced All-Around Setup
Configuration: 200Ah lithium, 400W solar, MPPT controller, 2000W pure sine inverter
Pros:
- Best balance of cost, performance, and convenience
- Handles most common RV loads comfortably
- Better reserve for shoulder-season camping
Cons:
- Air conditioning still usually requires shore power or generator support
- Roof space may limit solar expansion on smaller rigs
Who It’s For: This is the setup we recommend most often for couples and solo travelers who boondock regularly and want less power stress.
3. Extended-Stay Off-Grid Setup
Configuration: 300-400Ah lithium, 600-800W solar, 2000W or 3000W inverter
Pros:
- Strong battery reserve for cloudy weather
- Better support for work-from-RV setups and longer stays
- More flexibility with kitchen appliances and entertainment loads
Cons:
- Higher upfront investment
- Requires careful cable sizing and installation planning
- Added weight and complexity compared with entry-level builds
Who It’s For: Frequent boondockers, remote workers, and RVers who spend long stretches away from hookups.
Materials Needed for a DIY Power Upgrade
If you’re building or upgrading your own system, these are the core materials typically needed:
- Lithium or AGM batteries
- Solar panels
- MPPT charge controller
- Pure sine wave inverter
- Battery monitor with shunt
- Properly sized cables and lugs
- Class T or ANL fuses
- Bus bars
- Battery disconnect switch
- Mounting brackets and hardware
- Cable glands or roof entry plate
- Sealant rated for RV roof material
We strongly recommend adding a battery monitor. Voltage alone is not a reliable way to judge lithium battery state of charge.
How to Build a Safe, Practical System
Numbered Steps
- Calculate your daily watt-hour use based on real habits.
- Choose battery capacity first so you have enough overnight reserve.
- Size solar second to replace what you use each day.
- Select the inverter based on your highest expected AC loads.
- Match the charge controller to your panel voltage and wattage.
- Use correctly sized wire and fuses for every major connection.
- Install a battery monitor so you can track usage accurately.
- Test the system at home before relying on it in the field.
Safety Tips
- Disconnect power before working on wiring.
- Fuse positive battery connections close to the battery bank.
- Use cable sizes appropriate for inverter current draw.
- Vent and mount components according to manufacturer specs.
- Never assume factory wiring is adequate for a larger inverter upgrade.
- If you are unsure about DC electrical work, hire a qualified RV technician or marine electrician.
Common Mistakes to Avoid
Oversizing the Inverter, Undersizing the Battery
A 3000W inverter sounds impressive, but if you only have a small battery bank, it won’t perform the way you expect. Build the battery and charging side first.
Ignoring Furnace and Weather Loads
Cold-weather boondocking changes everything. Furnace fans can consume far more power overnight than many RVers expect.
Relying on Solar Ratings Alone
A 400W array does not produce 400W all day. Season, shade, panel angle, and temperature all affect output.
Skipping a Backup Plan
Even a strong solar setup can struggle in several days of rain or forest shade. For extended trips, backup charging from a generator or DC-DC charger is worth considering.
Final Verdict
For most RV owners, the best rv boondocking power setup is a 200Ah lithium battery bank, 400W of solar, an MPPT controller, a battery monitor, and a 2000W pure sine inverter. It offers enough daily usability for real off-grid comfort without jumping straight to a premium, high-cost build.
If you mostly take short weekend trips, a smaller setup can work well. If you boondock for long stretches or work remotely, step up to 300-400Ah of lithium and 600W or more of solar. The key is matching your system to your real habits, not someone else’s YouTube build.
FAQ
How much battery capacity do I need for RV boondocking?
For many RVers, 200Ah of lithium is the sweet spot. It gives enough reserve for lights, fans, water pump, device charging, and moderate inverter use without feeling too restrictive.
Is solar enough for full-time boondocking?
It can be, if your energy use is moderate and your battery bank is sized correctly. However, many full-timers still keep a generator or alternate charging method for bad weather and high-demand days.
Can I run my RV air conditioner while boondocking?
Usually not for long on a standard battery-and-solar setup. Air conditioners draw a lot of power and often require a large inverter, a large lithium bank, and significant charging capacity—or a generator.
Is lithium worth it over AGM for RV use?
In most cases, yes. Lithium batteries offer more usable capacity, faster charging, lower weight, and longer service life, making them a better long-term value for frequent boondocking.
What is the most important upgrade for better off-grid power?
If we had to choose one, we’d start with a lithium battery bank and battery monitor. Better storage and accurate tracking make every other upgrade more effective.
Top Picks & Comparison
| # | Product | Price | Rating | ||
|---|---|---|---|---|---|
| #1 |  |
Renogy 200 Watts 12 Volts Monocrystalline RV Solar Panel Kit with Adventurer 30A LCD PWM Charge Controller and Mounting Brackets for RV, Boats, Trailer, Camper, Marine, Off-Grid Solar Power System |
$285.99 | (521) | View on Amazon |
| #2 |  |
Renogy Inverter P2 2000W Pure Sine Wave Inverter 12V DC to 110V AC Converter, Off-Grid Solar Power Inverters for Vehicles, Truck, RV, Home, with Built-in 5V/2.1A USB / Hardwire Port, Remote Controller |
$285.99 | (2,032) | View on Amazon |
| #3 |  |
ECO-WORTHY 12V 100AH LiFePO4 Lithium Battery with SOC Display, Upgrade 2.0 with built-in Bluetooth, 100A BMS with Low-Temp Protection, Suitable for RV, Camping, Solar Off-Grid trolling motor |
$199.99 | (64) | View on Amazon |